Showing posts with label project bags. Show all posts

Friday, October 27, 2017

Pinterest Project - Project Bags!

Since I joined Flosstube, I noticed how popular project bags are. Stitchers are either making them or buying them. One stitcher said that she uses dollar store zipper bags for most of her projects, but wants a few pretty ones "just because". I get that.

I've made small zip bags in the past, more of a size for accessories.
These were fun to make, and they turned out really well. One thing that bothered to perfectionist seamstress in me were the unfinished edges inside. I knew that there was a neater alternative out there somewhere.

So I set out to find a tutorial for a pretty, lined project bag that was fairly easy to make. First I found The Twisted Stitcher's tutorial for a project envelope. I like the way this one looks. Instead of the zipper, this one closes with a flap. I must have been in a pink mode when I went to Joann's for the fabric for this.
This was so easy to make thanks to Vonna's instructions. She doesn't leave anything out, showing the viewer all of the steps used in making this envelope. I really like using the fusible fleece which gives the envelope body.
And on the inside, more pink. Ha ha ha. But look at how nicely everything is finished. No raw edges or fraying threads. I even made the pattern for this out of poster board so that I can make more of these. And I did make another one!
I absolutely will be making more of these. They are very easy to make and you don't have to be an expert seamstress to put these together!

Let's move on to zip bags. "Whitney Sews" is a Youtube channel that has a lot of fun and useful sewing ideas. Whitney's video tutorial for an "Easiest Lined Zipper Bag" is quick, but clear. She solves the problem of unfinished raw edges inside the bag by using French seams on the side seams. This is actually a great idea. My mistake when making this bag was using super-heavy interfacing. The tutorial instructions don't say anything about using interfacing, but I do like the bag to hold its shape. However, I should have used a lightweight interfacing to avoid bulk in the seams.
And wow, did that heavy interfacing create a LOT of bulk in the seams. I also cut the fabric to a weird size resulting in an odd-shaped bag. But that's all right. I can use this one for smaller projects. No problem.
Yes, I would definitely use this technique again, but of course with lighter interfacing. So if you want to sew an easy, uncomplicated bag, check out Whitney's video.

OK, now for something slightly more complicated. Averyclaire Needlearts has an online tutorial for a zippered project bag which looked promising. Then a fellow Flosstuber, Lisa, AKA Kindred Stitcher, went one step further and showed us how to make this particular bag in a video! You can find her video HERE. I'll admit that I had some problems with this project despite the clear instructions and Lisa's step-by-step video. First of all, I had trouble sewing the zipper in because it wasn't visible during the sewing process. That resulted in my sewing line getting too close to the zipper teeth in some places. Also, when I made my top stitch line by the zipper, I didn't catch the lining material. Both of these errors caused the zipper to get stuck because both the main fabric and the lining fabric kept catching in the zipper. Ugh. Definitely user error.
Cute, but yes, stuck in the closed position.
My sewing machine also balked at sewing through so many layers of fabric and interfacing at the top (the side seam above the zipper). It pretty much said, "uh-uh, not doing that". And my machine isn't particularly wimpy. I finally got a seam sewed up there, but it wasn't easy and it definitely wasn't pretty. So I had to put my problem solving skills into play and figure out a fix to this mess. Right now I'm in the process of removing all of the top stitching by the zipper and removing some of the stitching where the zipper is sewed in to close to the teeth. My plan is to restitch it and see what happens. I'll let you know in a future post.

Would I use these instructions again? I don't know. I definitely like the detail of this bag in that NO raw edges show on the inside! None. Now that I'm aware of the sewing-too-close-to-the-zipper-teeth problem, I can be more careful with that. But I don't know how I can get my sewing machine to neatly go through all of those layers.

And that, my friendly readers, is my project bag review. I have to admit that I did have fun making these and learned by making some goofy mistakes. How about you? Do you feel like getting crafty and making your very own project bag? I've provided several different options for you, all of them good. Which one do you think you'll make? Let me know if you do!

Thursday, February 19, 2015

Valentine Project Revealed

I recently took part in a Valentine's exchange where the rules were that, well, there were no rules.  Just stitch something, and if we wanted to turn it into something, we could.  I took this as a challenge.  I knew that I wanted to stitch something Valentine-inspired, and found a cute heart freebie online.  Then an idea popped into my head.  I could stitch a few hearts and incorporate this into one of my little fabric project bags. 
The stitching was done with DMC 115 - variegated red - on a slightly off white evenweave.  On a visit to my local Joann's I found an amazingly perfect fabric to use for the outside of the bag and also a cute contrasting fabric for the lining.
A peek at the lining fabric during construction.
Insetting the stitched piece into the bag was a little bit of a challenge because I had to be sure to get everything even and straight.  But I think this is very good for a first try.  I would definitely make another one of these.  And FYI, I used Luann Kessi's quilted bag tutorial which can be found here.  I just used her general instructions for this type of bag, not the quilting part.

Now it's time for "Other People's Creations", simply because I'm not the only awesome crafter in the world.  My sister, Sheila, just finished some lovely beaded lanyards for her girls' teachers.
Just look at these.  Aren't they beautiful?  No boring lanyards for these teachers!  And each one features a swivel clasp where they can add their school IDs.  What a nice thing to do for teachers who do so much for kids.  I'm sure they'll appreciate these!

If you're a new follower, welcome!  If you've been following for a while, thank you!  I appreciate all of my followers and love hearing from you in the way of comments.  I had so much fun at the Grow Your Blog party and with my giveaway.  So much so that I'm going to be having another giveaway very soon.  So please come back and visit!

Tuesday, April 22, 2014

The Gifts Are Revealed

A few posts ago, I talked about making gifts that I couldn't show pictures of -- yet.  They were for the members of my stitch group and were specially made for our stitch retreat.  The Sisters In Stitches meet every month for a stitch day and we always have a gift exchange.  It's a tradition that we would never want to give up.  So when it was time for our spring retreat, we planned our usual fun exchange.  For the occasion, I made a tote bag.
Pat was the recipient of this colorful bag.  It was lined in pink and has two pockets inside and a button closure.  The fabric also had a little sparkle to it.  It's just the right size for a few stitching projects and necessities.

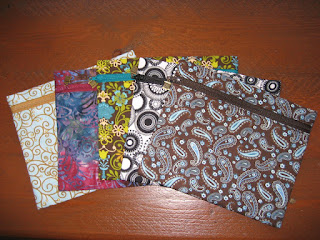
Occasionally I like to make something for the members of my stitch group.  Recently I learned how to make little zippered bags.  I had a lot of fabric remnants left over from making tote bags, so my plan was to stitch up a bunch of bags.  I didn't realize that zippers are so weirdly expensive.  So I did a little research and found a great deal on Amazon - 25 zippers in a rainbow of colors for a very small price!  After a little matching and color coordinating, this is what I came up with.
A little special touch.  I found these cute charms on Etsy.
My fellow stitchers were surprised and delighted!  These little bags can be used for stitching supplies, a very small project, makeup, or just as a little bag in your purse to keep small stuff organized.  I hope that everyone enjoys using this little keepsake of our retreat. 

See?  I told you that my sewing machine got a major workout during the past month or so.  I had fun making these bags and will make some more in different sizes.  What a great use for fabric remnants!