Monday, February 25, 2013

Frame It Yourself

The question for many of us stitchers is how we're going to finish our project once we're done stitching it.  We can find all kinds of finishing methods online, but probably the most common one is to frame it for displaying on a wall.  If you've ever had something professionally framed, you know all about the sticker shock involved with that.  There is no question that the quality of professional framing is excellent, with countless choices of mats and frames.  But if you stitch a lot and want to frame a lot, it's good to know another alternative so that you don't have to eat store brand macaroni and cheese every night because your food budget is going to the local frame shop.

I found American Frame online and made the decision to purchase some framing supplies for a small project to frame by myself.  It was surprisingly easy, and I've since framed many projects.  This company has always supplied me with very good quality frames and supplies to do the job correctly.

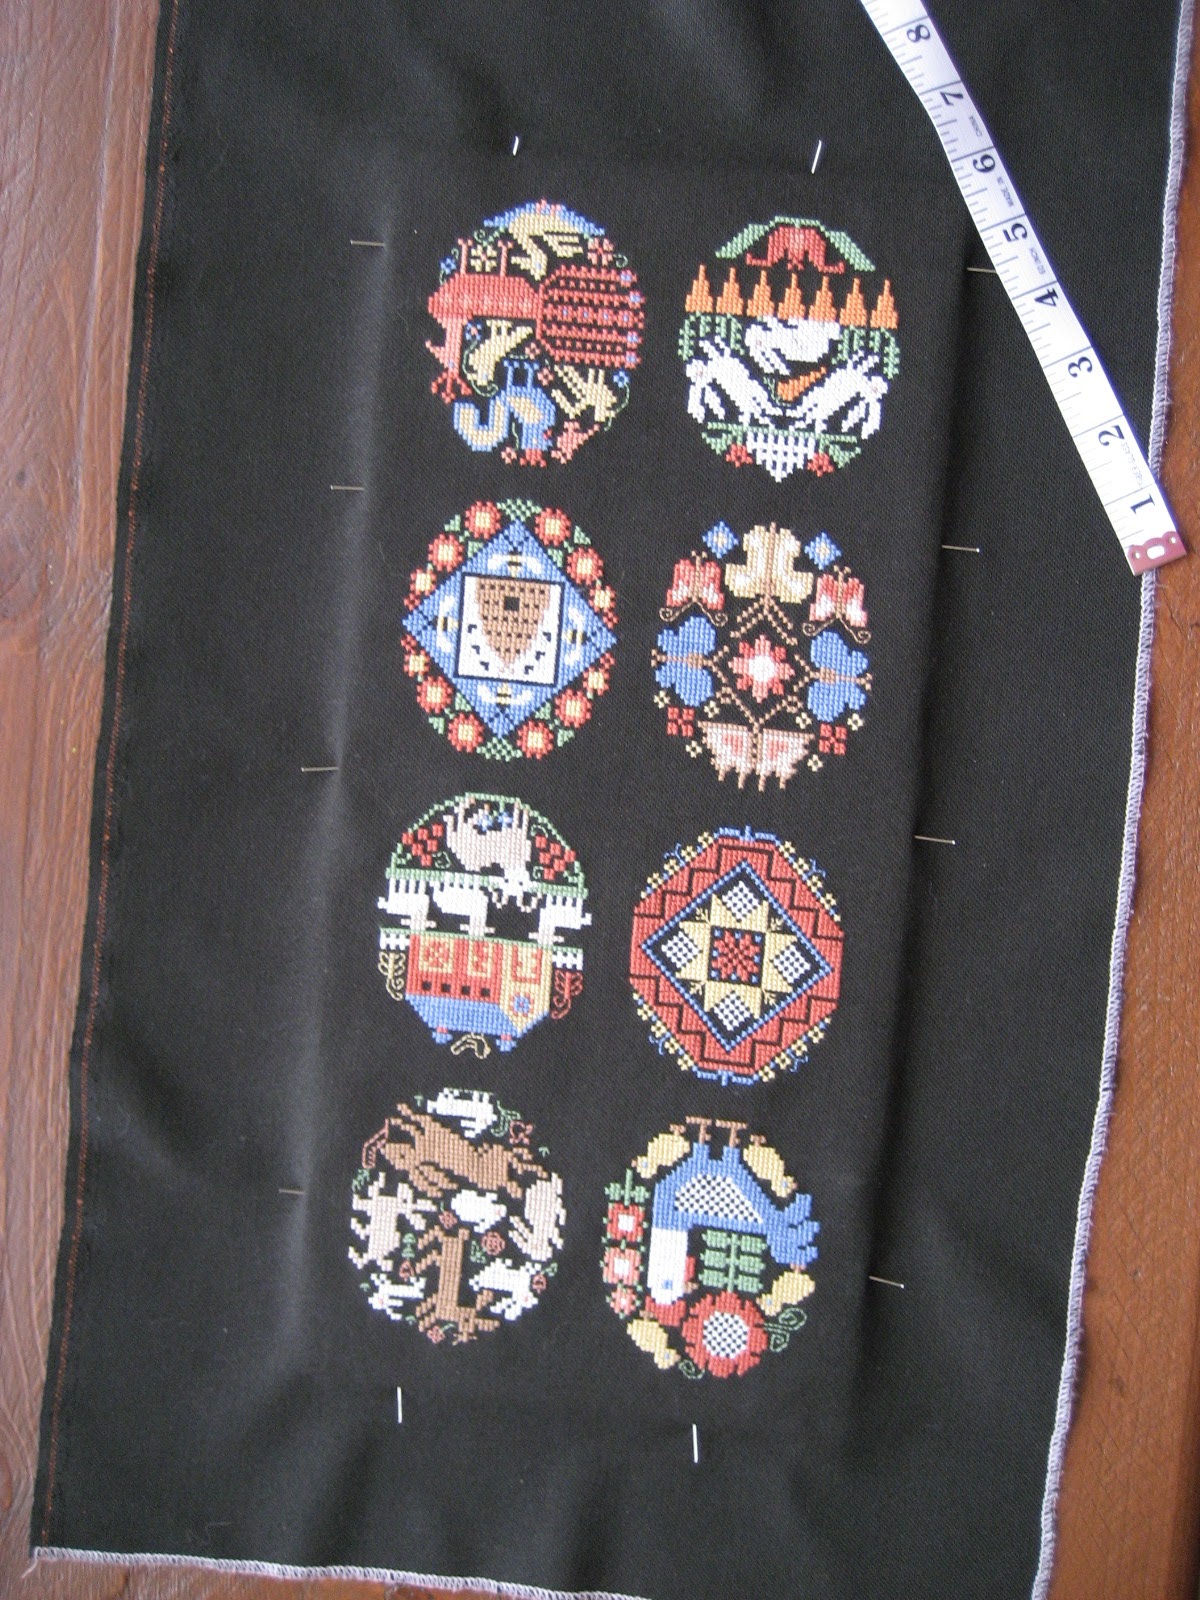
This past weekend I put my Folk Eggs into a frame and photographed the steps to help you to understand just how easy it was to do.

First, I placed the mounting board (foam core) on a clean surface and then laid the finished work on top.  Then I measured around the edges to get an even margin around the edge of the work, and began to pin.  I use silk or satin pins which go into the side of the foam core easily.  I left them sticking out for the time being. Keep measuring to make sure that the work is centered.
Next, I added pins, still measuring and when it's even all around I start pushing the pins in all the way.
Now is the moment of truth. Place the pinned work into the frame to make sure (once again) that everything is even.  Now is the time to make any adjustments.  Just take pins out a couple at a time and adjust the fabric where needed.  You don't have to unpin the whole thing.  Who wants to do that?
Looks pretty good so far
You can see that I don't have much of a space between the edge of the stitching to the edge of the mounting board.  That's because I chose not to mat this particular project.  You'll have more of a margin if you choose to mat. Now let's do something with all of that fabric.  You can trim some of it off, or leave it as is if it's a manageable amount.  I left mine as is.  Time to start taping.
I use about 1" of Terrifically Tacky (double sided) tape to stick the corners to the mounting board.  Don't pull so tight that the corners pop through the fabric!
Fold edges in one at a time and use enough double sided tape to adhere the edge.
All taped down and placed into the frame
Looks like I could have trimmed some of that fabric to have a little less bulk.  Yeah, probably, but it's not going to affect the framing and I'm not about to go and untape and unpin everything after all that.  Uh-uh.
Here's the part where I need a little help.  Those little glazier points are great for holding the work into the frame but they can be really difficult to put into the wood.  So Mark is my trusty helper at this point.  As a bonus, he also puts the sawtooth hanger on the frame.

Next, you need some kind of backing on that to keep everything clean for many years.  I use plain brown kraft paper.  Well, mine has little stars on it.  Just cut a piece a little smaller than the frame.  Brush on a light coating of white glue on the back of the frame and stick that paper on.  Then spray a little water on the paper.  Really.  When it dries, it's nice and flat.  Just a light spray, don't soak it.
And here's what I ended up with!  Once again, I'm very happy with this frame.  It's kind of a distressed, whitewashed look with tiny bows all around.  It goes perfectly with the Folk Eggs.  And, miracle of miracles, it's all ready for Easter!

As I said before, I chose not to use a mat in this framed piece.  I also decided not to use glass or plexiglass.  I use glass for some projects and both mat and glass for others.  American Frame sells these items, and also cuts everything to order for your project.

I hope that this little how-to helps you if you want to become a DIY framer.  This is just how I do framing, and I'm sure that there are other methods to each of my steps.  I'm always open to suggestions for new or better ways of doing things, and this is no exception.  So let me know what you think!

Saturday, February 23, 2013

Butterflies & Bunnies

I'm happy to say that progress is being made on my quilt squares for the Facebook group I belong to.  I committed to stitching two squares, but I'll probably end up doing four.  The quilt project we're stitching for is huge.

Last week I completed square #2, a pretty butterfly freebie I found online.
Square #3 is also from a freebie online chart.  I really like the colors in this one, especially after I switched the pink for purple.  I'm calling this one "Pastel Bunny".  Because I want to.  It looks a lot more pastel in person. 
So of course, in an effort to get these squares completed, I've been ignoring my other stitching.  I'm not even sure what my current WIP's are right now as I haven't even looked at them since 2012.  Seems so long ago. 

Just wanted to post a stitching update.  Keep checking in -- I'll be posting a framing how-to and something new and different.

Wednesday, February 20, 2013

Heart Of Gold

Last week was Valentine's Day, and there were so many lovely Valentine related items in blogs and on Pinterest.  I realized that I don't have anything stitched for this holiday!  So a new goal for me:  to create a stitched piece to display for next February 14th.  OK, I have a year so this is completely doable.

One pretty little thing I saw on a blog were these tiny crocheted hearts.  The link for the how-to was provided, so I took a look.  Then began the search for some yarn.  Here's what I came up with:  old gold or gray.  No Valentine red or candy-heart pink, or even white.  Well, this is just practice right?  So old gold it was.  And here is what I accomplished!

This is a big deal to me because, if you'll remember, my crocheting skills were limited to square or rectangle things.  Look at me, I'm branching out!  I have skills! 

So, fellow crafters, be sure to take a look at the blog, Maybe Matilda, for an abundance of crocheting, sewing, decorating ideas, and more.  I'm having fun perusing all of the beautiful photos and crafting ideas she has there.  I think you will too.

Monday, February 18, 2013

Blog Hop #16 - Needles, Lost & Found

The subject of lost needles is featured in Blog Hop #16.

How many needles have you lost? Feel free to estimate. Tell us your best “lost needle” story.

Losing a needle can be a painful situation for us stitchers.  Over the years I've lost a few, but I honestly don't know how many.  Maybe a dozen?  I'm usually hyper-careful about the location of my needle because of what happened to my aunt many years back.  She liked to sew and therefore had occasion to use hand sewing needles (the sharp ones).  One day she stepped on one and got it lodged in her foot where it moved its way up so they couldn't get it out.  I know she ended up hospitalized (this was a long time ago, folks, before the days of outpatient everything), but I am not sure what exactly they did to retrieve the needle.  As I said, I was young at the time and probably didn't want to know the details.  But this story has stuck (oh, I'm sorry for the pun) with me and has made me vigilant about the location of my needles.  I do drop them from time to time and luckily have a husband with an eagle eye who can locate the errant needle.  I also have this gadget.
I don't know what it's called, but I bought it at my LNS a few years ago.  It looks like a pen and has a very strong magnet on the end.  It also telescopes out to about 2-1/2 feet to grab the most wayward needle.  Pretty handy!

Visit all the blogs in this round of the Stitching the Night Away Stitching Blogger Blog Hop:
Find the instructions on how to participate in this round by clicking here.
Stitching the Night Away Stitching Bloggers Blog Hop


Saturday, February 16, 2013

What Brightens My Day

Don't you just love getting cool stuff in the mail?  My mailbox contained a few goodies this week.  I found the cutest little wooden sewing acorn on Ebay.  I'd seen these before and always liked them, plus I love acorns, so I clicked the "buy it now" button and it was mine!  Since Mark is crafty with the wood lathe, I'm going to challenge him to make one of these!  And in the meantime, I'm going to enjoy using this sweet little acorn.
During the Grow Your Blog party, many bloggers were holding giveaways in connection with the event.  In an unheard of turn of events, I WON!  You see, I usually don't win anything.  But this time I was lucky enough to win this cute little corsage from Christine at The Alchymyst's Study!
You know how I love receiving handmade things.  I'm a big fan of craftiness, whether it's mine or someone else's.  And it's so pretty and springy.  Thank you Christine!

Speaking of giveaways, Meggie from Cross Stitch Cottage is having a very cool giveaway to celebrate reaching the 100-follower mark on her blog.  Check it out -- I'm sure that you'll agree that it's a very generous prize!

I'm making very good progress on my second stitched quilt square, even with the return of the dreaded trigger thumb.  Ugh.  Off to the doctor I went for another shot in the thumb, and was informed that this would be the last one.  Next time it will be surgery.  Nooooo!  But so far it seems to be doing better and it doesn't hamper my stitching much.
I found this little freebie butterfly chart online.  Cute, right?  No color key, so I had to choose the colors myself, sticking to the colors on the chart.  Or thereabouts.  I have a little more border to go, and then I'll move on to square #3.

More good news for my stitch group, Sisters In Stitches!  We have our retreat all planned and the location reserved.  I'll make sure that I let you know how it goes and take plenty of photos.  Also, we have a new location for our monthly Stitch Days!  Things seem to be going well for the Sisters In Stitches!

Mark and I went to Cracker Barrel for breakfast today and out of the corner of my eye, I spotted something I never thought I'd see again!  A blast from the past!  A treat from childhood!  Bonomo Turkish Taffy!  I didn't know they made this stuff anymore.  I remember getting it from the store, walking out, and then slamming it on the ground.  This would crack it up into a lot of little pieces, thus preventing us from biting right into the bar and possibly incurring tremendous dental bills.  I haven't tried it yet, and am hoping it's just as delicious as I remember.  Yes, I know that the picture is sideways.  It's the right way in my photo album, so I think it's a Blogger thing.
One more thing:  I want to say "Welcome" to all of my new followers.  It's always a pleasure to see my follower number tick up little by little.  And I love hearing comments from all of my followers.  OK, now I'm off to enjoy the coffee treat (complete with froth) that Mark has made for me.


Saturday, February 9, 2013

The Need To Bead

While looking through my vast collection of beads one day, I figured that I should actually make something with my beads rather than leaving them to sparkle in their little compartments.  Remembering that I had once enjoyed crafting a beaded rope bracelet, I also knew that I'd need a little refresher course on how exactly to do it.  That's where YouTube came in.  You can find all sorts of crafty instructions there and I did locate quite a few on how to do the beaded rope stitch, or spiral rope.  I finally settled on one that explained it clearly and went to work. 

I used 6/0 seed beads in brown and blue for my project.  After watching the video for a few minutes, I found that I easily remembered the spiral rope.  And here's what I came up with.
The beads I used were not very uniform in size, so I didn't get the even result that I was looking for.  But all in all, I think it turned out pretty good.  I'd like to try this with smaller seed beads, or maybe even Delicas for a less chunky look.  I used a different video to learn how to attach the clasp.  If  you're looking for a fun project, this one is easy and quick.  You can put one of these together in less than an hour.  Really.

 I also indulged in some baking craftiness, spurred on by some very ripe, spotted bananas sitting on my counter.  And the result was some delicious banana bread.  Apparently one of the cats thought it smelled just delicious and couldn't resist.  He (I'm looking at you, Ozzy) chewed through the foil I had covering it and attacked a good portion of the top of the loaf.  He must have liked it a lot.  Note to self:  never leave any food item out where a cat can get to it.  And that includes the top of the refrigerator.
Here in Georgia, we are having pretty good weather compared with some other parts of our country.  It is a little cold at times and the cats are always seeking out heat sources, like the heat registers or spots of sunshine.  And sometimes it's all peace and harmony when they cuddle together.
Cosmo & Moxie putting aside their differences.
And where's Ozzy, you ask?  Oh, probably off in search of something to eat.


Tuesday, February 5, 2013

Under The Weather Stitching? - Blog Hop #15

Yay, the Blog Hop is back!  The question for Hop #15 is so timely, since it's "cold and flu season".

Eventually there comes a time when you’re not feeling well, whether it’s the flu or a cold or something else entirely. The question is, do you manage any stitching when you’re under the weather or does it just have to wait for better days?

That sound you're hearing?  It's me knocking on wood.  Repeatedly.  That's because I haven't been sick very much lately.  I had a nasty cold in October, but that was the first one I had in about 3 years.  And I used to be a two-sinus infections-a-year kind of gal.  Happily not anymore, but who knows why.  But when I am sick, I find it really difficult to stitch or even to read because the cold or whatever is usually accompanied by sinus pain or a headache.  On the positive side, I can always tell that I'm getting better by wanting to stitch!  So, knock on wood, I won't have to deal with this issue any time soon.  And I hope that all of you have an illness-free winter!

Visit all the blogs in this round of the Stitching the Night Away Stitching Blogger Blog Hop:
Find the instructions on how to participate in this round by clicking here


Stitching the Night Away Stitching Bloggers Blog Hop


Friday, February 1, 2013

Grow Your Blog Drawing Winner!

I'm happy to announce that the winner of my Grow Your Blog Drawing is:

Sandra from Thistle Cove Farm!

I've already e-mailed Sandra, and the bracelet will make its way to her as soon as I hear from her.  Congratulations, SandraAnd thank you to everyone who participated and commented.