Showing posts with label sewing. Show all posts

Wednesday, June 28, 2023

Back To Blogging!

I'm back. I know, I know. How do I explain an almost three year absence from blogging? Not going to make excuses. It seems that blogging has somewhat fallen out of favor with some crafters. I say some because when I look at my list of blogs I'm following, I see many that have been blogging for a long time and still are keeping this mode of communication alive. So I'm jumping back in with a tiny splash.

I've updated the look of my blog (that took a while because I haven't done any layout fixes in a long time and Blogger has changed some of their methods), and am now ready to get back into blogging regularly. Oh and I know that my Cat of the Month already says "July" but it will be July soon, and I couldn't find my June cat. I'll get better.

Since I last posted, a lot has changed in my life. I'm now retired. Hopefully this time it will stick. We've come out of the pandemic, thank goodness. That was getting really old. We lost our little cat, Moxie and then adopted two more cats because we didn't like being cat-less.

Rigby and Casper

Rigby is three years old, and Casper is a year and a half. They're both very good cats with personalities like no other cat we've ever had. We adopted both of them from the Feral Cat Program of Georgia. 

One thing that hasn't changed for me is stitching and crafting. As some of you may know, I have a Flosstube channel. Now I know that not everyone likes Flosstube and that's fine with me. I get it. I still enjoy reading stitching blogs as well as watching Flosstube videos. Here's the link to my Flosstube channel, CraftyCat Stitcher:  https://www.youtube.com/@craftycatstitcher6658/featured .

So as far as the stitching goes, it's still my favorite hobby and I devote lots of time to it. I still consider myself the slowest stitcher in the world. Ha ha. But that doesn't put a damper on my enjoyment of cross stitch! I also continue to collect new charts because there are soooo many beautiful ones out there. Do you agree?

Sewing and crafting are also favorites of mine. I consider finishing a cross stitch project in a non-framed way pretty crafty. And I enjoy it. My latest sewing project is this lovely flag.


It took only an afternoon to make this, and what took the most time was sewing the buttons on. I was very happy that I had all of the materials in my craft room for this. Would you like to make one? You can find the instructions for this on the Instagram page @teamegner. It's in her DIY section on her profile page. The one shown in the instructions is quilted and is lovely. However, I'm not a quilter and just wanted this to be an easy project for me so I opted to skip that part. 

So this is my comeback to blogging. I hope you enjoyed what you saw here. My goal is to share all of my stitching with you, along with anything else crafty that I do. If you're reading this, please leave a comment so I'll know I'm reaching fellow stitchers. Please consider subscribing as well. I do appreciate it.

I'll see you soon. Happy stitching.

Cathy


Monday, May 13, 2019

A Lot Of Sewing Going On

I had a "craft room day" today. It was my day off so I dedicated it to doing stuff in my craft room. Sometimes I get so busy that I just pass that room by and look in longingly. So today was the day. I organized my cross stitch fabric, kitted up a new project, and did some sewing.

I'd been ignoring my sewing machine for a while and wanted to do a small project so I made a lined zipper pouch. I followed the complete and easy to follow instructions on the video "How To Make a Lined Zipper Pouch" on the channel "Needlepointers" on YouTube.
If you've been following my blog for a while, the fabrics might look familiar to you. I made a larger project bag out of them last year. But this small bag is for a **giveaway** on my YouTube channel, CraftyCat Stitcher. I figure the recipient won't mind the repeat fabric performance.

This bag is fully lined and has no raw edges. The only change I made was to add some medium weight sew-in interfacing. I sewed it close to the edges of both lining pieces as the first step, then followed all of the other instructions. I love it! I will be making more of these. They recommend using a zipper the exact width of the bag, but I bought a bunch of 16" zippers on Amazon for a good price. Sixteen inch zippers can be easily cut down to whatever size you need. Just don't use your good scissors to cut them!

Previously I had made a vinyl-front project bag using the instructions from Calico on this video. This will also be part of the giveaway. You can see photos of it on my previous post.

Here's what I came away with after today: I need to do craft room days more often!

Please come on back and visit again! I appreciate all of my blog followers and enjoy each and every one of your comments. See you soon!

Friday, July 27, 2018

Sew Fun!

I have a confession: I really don't like to sew clothes. I used to. In high school and college I sewed many of the things in my wardrobe. But I do like to sew, and use my machine a lot for other little projects like project bags and totes. Recently I found a like-new sewing machine for sale online, and after doing some research, I found out that the price was right and it had only been used once! I'll take it!
I already have a sewing machine, but it's pretty basic. This one is computerized and has many features that I know I'll use. So time to try it out!

One of the first things I wanted to make was a project bag. I had watched Calico's video on Youtube for a vinyl-front bag. Her idea for the bag was inspired by Dina at Making Life Count on Youtube. I like both of their instructions, but decided to go with Calico's. Here's what I came up with.
The vinyl was a bit of a challenge to sew with, but Christine (Calico) gives you some tips on how to handle it. My edging is a bit wonky, but I will say that the zipper portion of this bag is super easy. I like how it turned out and love the summery fabric. Yes, I will make more of these. I figure that practice makes perfect.

I had some of that cute paisley fabric left, so I sewed some scroll rod covers for my Rola Frame.
I used instructions from Tricia The Left Handed Stitcher on Youtube. It's a good tutorial. Just stick with it if you plan on making some of these. The video shows measuring instructions after the sewing instructions so just stay tuned.

Next, I wanted to try a really easy basic bag. I found Na T's Zipper Bag Sewing Tutorial on Youtube and thought it looked pretty easy. The beauty of this bag is that it has no raw edges showing on the inside. (Neither did my vinyl fronted bag, by the way). I used fabrics that I had in my stash from other projects.
This one has a basic top zip. I wasn't sure what size fabric to use, and my bag came out kind of square. It'll work though. I added interfacing to give the project bag more body. Next time, I might use some fusible fleece. And maybe try to make it a little more rectangular.

I'd say that I gave my new sewing machine a good trial run and have some more projects planned for it. I've also used it to edge some cross stitch fabric. All in all, I'm very pleased with my purchase.

Thank you for all of your comments on my last post. I still can't figure out what's wrong with my commenting abilities. So if I subscribe to your blog and you don't see comments from me, it's because I simply can't. Again, some blogs let me comment and some don't. No rhyme or reason. Also, I found out that I can't do replies on comments on my own blog!! 

So I'm going to answer Mary's question from my last post right here. Mary, here's how I do my stitching rotation: I stitch on one project for about three days, and then I switch to the next one and stitch that one for three days. And so on and so forth. If I have something that I really want to finish, I'll add it to the rotation more often.

Thanks for all of your comments! I'll be answering any questions right here in my blog. And meanwhile, I'll try to figure out what the deal is with my commenting ability. I hope you'll come back to visit and see what I'm up to.

Friday, February 16, 2018

A Variety Of Craftiness

For the past couple of months I haven't been too crafty. I do pick up my stitching on some evenings, but getting things done in the craft room has not happened. Working some extra hours, and working different times has thrown my routine off completely. I guess I'm one of those people who thrives on routine!

I did do some sewing for a gift at Christmas. I made this project bag for my group's December stitch day. As I mentioned in the past, we exchange gifts at each stitch day, and I thought that someone would really like this.
I used the Twisted Stitcher's project envelope instructions for this, and love the way it turned out. Because of a weird early snow, we had to postpone our special Christmas extravaganza stitch day until January. And that suited us just fine!
I opted for a magnetic snap for the closure for this one. You can get them very inexpensively at Amazon.
The snap shows on the outside of the project envelope so I needed something pretty to cover it. I looked around at Joann's and didn't find anything, but when I looked through my own jewelry making supplies, I found this! I think it's a connector of some sort, but it worked out perfectly because I could sew it right over the snap.
Don't you just love the lining fabric? You can't see it here, but it's sparkly!

Meanwhile, other people have been crafty! Here's another edition of Other People's Creations.
In case you're not familiar with this feature of my blog, I'll explain. Occasionally I like to show what other crafters are doing. They are mainly friends of mine and I do have some talented friends!

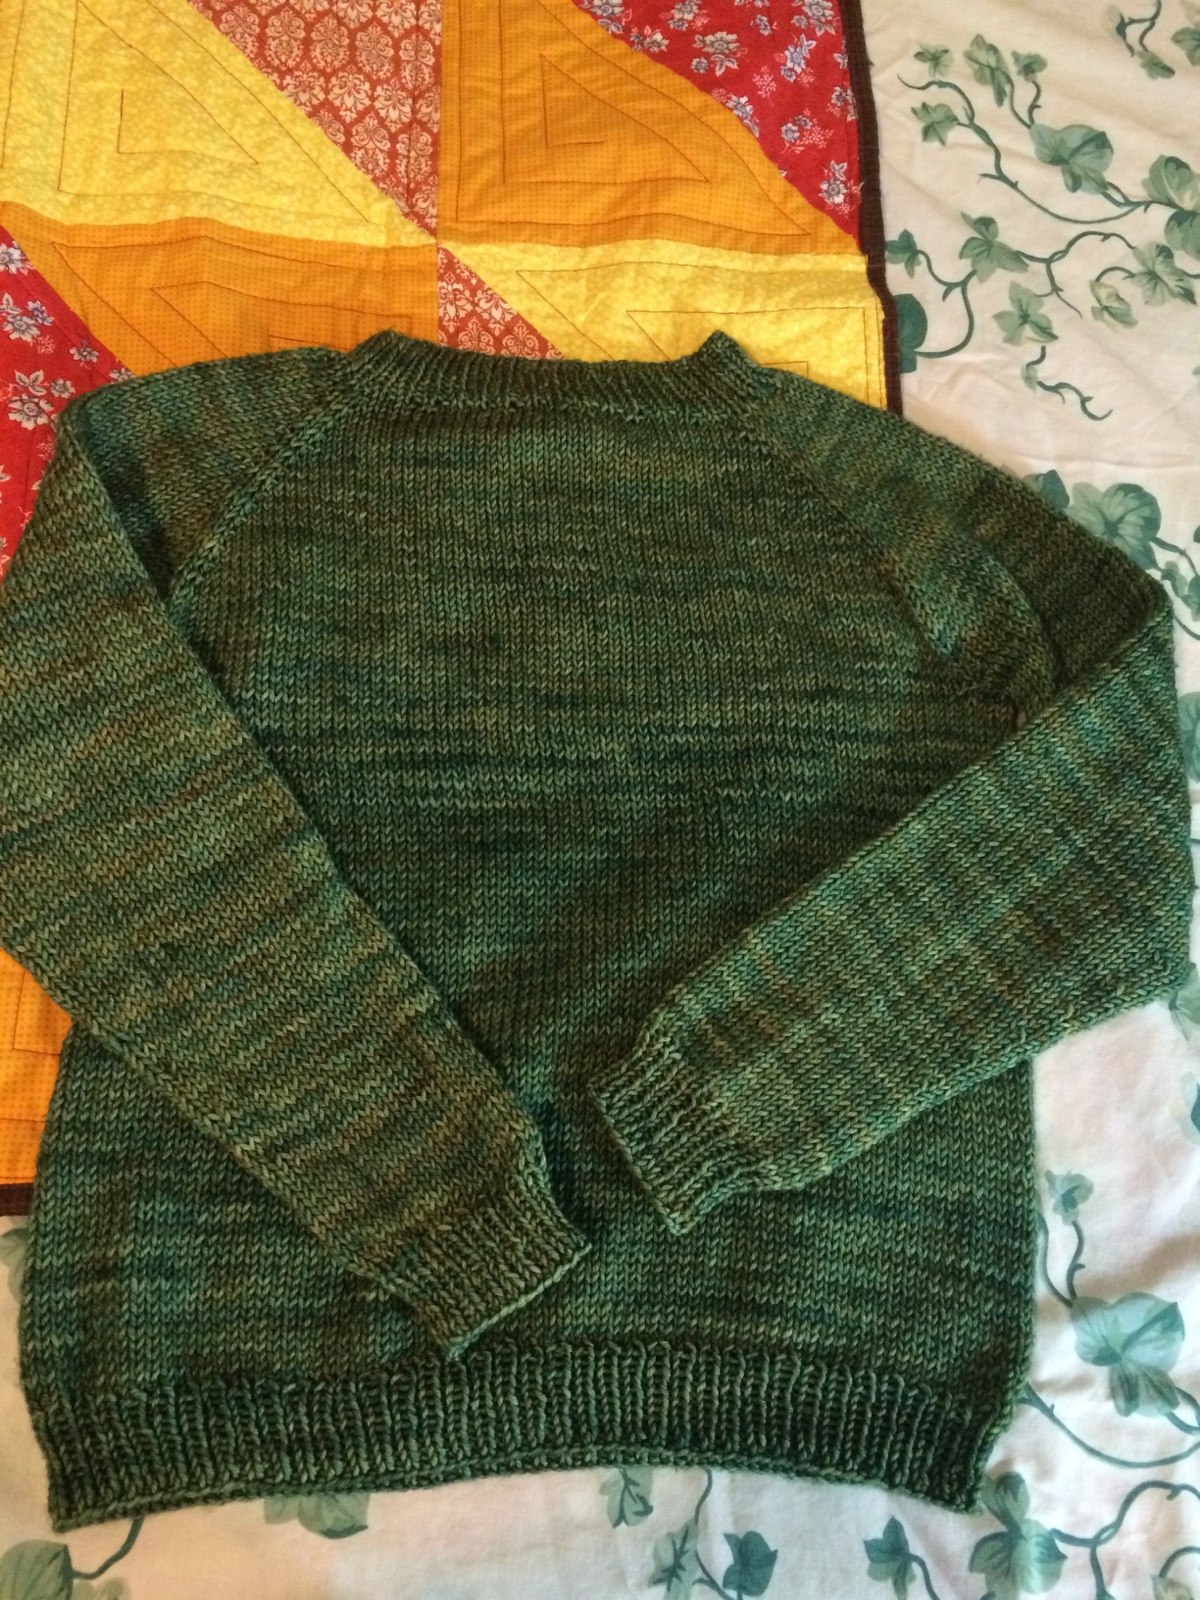
Let's start with some knitting. My daughter in law, Stephanie, always amazes me with her knitting skills. She was working on this sweater when she and Matt visited for Christmas, and recently sent me this photo of her completed project.
Wow, right? Not only is it something that can be worn, it's incredibly detailed. I haven't mastered knitting, so this to me is wonderful. As are these socks.
See, I told you she is amazing. I'd say she has a gift for knitting.

My sister, Sheila, crafted a beautiful gift for each of us at stitch day.
She made these rose ornaments out of polymer clay. Again, this photo doesn't show the real beauty of this flower. They're luminous and kind of iridescent, as well as very detailed. What a lovely gift to receive!

And all of us Sisters In Stitches were lucky to receive another wonderful handmade gift.
Thea presented us with these sweet pin cushions. She used deep red velvet fabric and a pretty button to crown the top.
This pin cushion is very solid as it's filled with a combination of emery and crushed walnut shells.

How lucky are we to receive handmade gifts? As crafters/sewers/stitchers, we all know what goes into handmade items, so it's pretty special to be gifted with something that someone made.

I hope you enjoyed seeing the craftiness of my friends and family, as well as my own! Please stop by again. I still need to find a good balance of work and working on my own creative projects. So hopefully, I'll get back to more regular posts. Watch for my Wipocalypse post coming at the end of the month for my stitching progress! Until then, have a great week!

Friday, October 27, 2017

Pinterest Project - Project Bags!

Since I joined Flosstube, I noticed how popular project bags are. Stitchers are either making them or buying them. One stitcher said that she uses dollar store zipper bags for most of her projects, but wants a few pretty ones "just because". I get that.

I've made small zip bags in the past, more of a size for accessories.
These were fun to make, and they turned out really well. One thing that bothered to perfectionist seamstress in me were the unfinished edges inside. I knew that there was a neater alternative out there somewhere.

So I set out to find a tutorial for a pretty, lined project bag that was fairly easy to make. First I found The Twisted Stitcher's tutorial for a project envelope. I like the way this one looks. Instead of the zipper, this one closes with a flap. I must have been in a pink mode when I went to Joann's for the fabric for this.
This was so easy to make thanks to Vonna's instructions. She doesn't leave anything out, showing the viewer all of the steps used in making this envelope. I really like using the fusible fleece which gives the envelope body.
And on the inside, more pink. Ha ha ha. But look at how nicely everything is finished. No raw edges or fraying threads. I even made the pattern for this out of poster board so that I can make more of these. And I did make another one!
I absolutely will be making more of these. They are very easy to make and you don't have to be an expert seamstress to put these together!

Let's move on to zip bags. "Whitney Sews" is a Youtube channel that has a lot of fun and useful sewing ideas. Whitney's video tutorial for an "Easiest Lined Zipper Bag" is quick, but clear. She solves the problem of unfinished raw edges inside the bag by using French seams on the side seams. This is actually a great idea. My mistake when making this bag was using super-heavy interfacing. The tutorial instructions don't say anything about using interfacing, but I do like the bag to hold its shape. However, I should have used a lightweight interfacing to avoid bulk in the seams.
And wow, did that heavy interfacing create a LOT of bulk in the seams. I also cut the fabric to a weird size resulting in an odd-shaped bag. But that's all right. I can use this one for smaller projects. No problem.
Yes, I would definitely use this technique again, but of course with lighter interfacing. So if you want to sew an easy, uncomplicated bag, check out Whitney's video.

OK, now for something slightly more complicated. Averyclaire Needlearts has an online tutorial for a zippered project bag which looked promising. Then a fellow Flosstuber, Lisa, AKA Kindred Stitcher, went one step further and showed us how to make this particular bag in a video! You can find her video HERE. I'll admit that I had some problems with this project despite the clear instructions and Lisa's step-by-step video. First of all, I had trouble sewing the zipper in because it wasn't visible during the sewing process. That resulted in my sewing line getting too close to the zipper teeth in some places. Also, when I made my top stitch line by the zipper, I didn't catch the lining material. Both of these errors caused the zipper to get stuck because both the main fabric and the lining fabric kept catching in the zipper. Ugh. Definitely user error.
Cute, but yes, stuck in the closed position.
My sewing machine also balked at sewing through so many layers of fabric and interfacing at the top (the side seam above the zipper). It pretty much said, "uh-uh, not doing that". And my machine isn't particularly wimpy. I finally got a seam sewed up there, but it wasn't easy and it definitely wasn't pretty. So I had to put my problem solving skills into play and figure out a fix to this mess. Right now I'm in the process of removing all of the top stitching by the zipper and removing some of the stitching where the zipper is sewed in to close to the teeth. My plan is to restitch it and see what happens. I'll let you know in a future post.

Would I use these instructions again? I don't know. I definitely like the detail of this bag in that NO raw edges show on the inside! None. Now that I'm aware of the sewing-too-close-to-the-zipper-teeth problem, I can be more careful with that. But I don't know how I can get my sewing machine to neatly go through all of those layers.

And that, my friendly readers, is my project bag review. I have to admit that I did have fun making these and learned by making some goofy mistakes. How about you? Do you feel like getting crafty and making your very own project bag? I've provided several different options for you, all of them good. Which one do you think you'll make? Let me know if you do!

Saturday, September 3, 2016

Talented And Crafty Friends

From time to time I like to include the craftiness of others in my blog. I hope that you like it. I feel that we would all be missing out on something if these non-bloggers' work isn't shown. I call this segment "Other Peoples' Creations" I haven't featured this in a long time, so today is our lucky day.

One of the reasons we look at crafting blogs is to see what everyone is up to in the creative world. Let's not let this creativity go unnoticed! This post is picture-heavy but I hope you'll have fun seeing all of the gorgeousness.

First off is Peggy's "Angel Of Summer" by Lavender & Lace. Peggy really likes to stitch big projects and is mostly a one-project-at-a-time stitcher. Nothing wrong with that. That kind of discipline is why she always completes complicated and large stitching projects in such a beautiful way.
All framed.
I've included a couple of close-ups so that you can see the detail. Look at that flower garland, so detailed.

My sister, Sheila, and I recently went to a wire wrapping class at a local bead store. It was fun and I did learn a lot, but Sheila is definitely the more talented wire worker of the two of us. At our last stitch day, she gave this as a gift.
Sheila took her wire wrapping skills and ran with it, creating this necklace made with wire-wrapped beads and wrapped loops. Just gorgeous!

Thea is talented at the sewing machine. She showed our group her latest project, a sewing/cross stitch organizer. She used quilted fabric in coordinating colors.
Inside
Outside
I really like this. It's such a pretty to carry all of your necessities! Thea calls this a prototype, but I don't think there's much to improve on!

In just two short weeks, Stephanie will become my daughter-in-law. She is also a talented knitter, quilter, stitcher, and seamstress. It's wonderful to have these shared interests and I always like seeing what Steph has created. Here's her latest.
Just look! A sweater! As someone who doesn't knit, I appreciate knitters' work all the more. And when you can make something that can actually be worn, it's more amazing to me. It looks so professional and well made. I'm sure that this will be perfect for those Boston winters. Oh, and the orange/yellow/red quilt in the background is another of Steph's projects.

Last and definitely not least, is a gift that I received from my friend, Suzanne, quite a few years ago. I don't know why I've never featured this here, but I'm finally going to show it off.
Yes, Suzanne made this beautiful knitted and felted bag just for me. I just love it. When I'm not using the bag, it is on display in the craft room.

I hope that you like this edition of "Other Peoples' Creations". I just believe that it's so inspiring to see what other crafters make.

Come on back to my CraftyCat blog and see what's going on. Comments are always appreciated, and I love getting new followers!

Friday, August 28, 2015

August Pinterest Project!

It was time for a little sewing when I chose my Pinterest project for August.  Ever since I pinned this tutorial, I knew that I wanted to create one of these cute tote bags. The tutorial is generously offered by The Inspired Wren and you can find the instructions here.  Here's a photo of the bag on The Inspired Wren's blog.
The bag pictured in the tutorial.  Not mine.

Selecting fabrics for the bag meant a visit to Joann.  Oh darn.  Ha ha.  I'm actually a frequent shopper at Joann, and never, ever consider going there a chore.  It's a veritable wonderland of crafty stuff.  The store that's nearest to me is a smaller Joann, but there's a giant one that's a little bit of a drive.  When you go there, the amount of fabrics can get your head spinning if you're not careful.

OK, back to the project.  So I selected my fabrics.  I liked the one for the main body of the bag so much, but found that other than black, it would be difficult to match or coordinate a third fabric.  The lining/trim and handles would all be the same black patterned fabric.
THIS one is my tote bag.
I also had to get some fusible interfacing.  I chose a heavier weight one when the pattern called for a medium weight.  The woman at the fabric told me that she had recently sewn a makeup bag and had used a heavy weight interfacing and wasn't happy with it.  She told me this story a couple of times as she cut the fabric and I didn't realize that she was trying to tell me to get a medium weight.  I wish that she had just come out and said that, but I think that she was trying not to be too bossy.  She was right, though and I'll know that for next time.

Above is another view of the tote bag.  This is the shape it actually is - very rectangular, about 9-1/2" wide and 12" tall, and 2" deep.  I can see how I can easily change the dimensions of the pattern pieces to make a larger bag.  This one, however, is the perfect size to carry a few books back to the library.

One thing I re-learned by sewing this bag is how to make a French seam.  I had to do a refresher course since the last time I sewed a French seam might have been back in high school sewing class.  Do they even have those anymore?  Anyway, that was long, long ago.  I went to trusty Youtube and found this tutorial (although there are quite a few of them).

One thing I added to the tote bag was a shaper/strengthener piece at the bottom of the bag.  I cut a piece of foam core board the same size of the bottom of the bag and then covered it with fabric.  I used the main fabric for contrast, but you can also use the lining fabric.
Use some double sided tape to adhere this piece to the bottom of the bag. 

I would highly recommend this project!  It can be done in a day, or probably an afternoon if you're a quick sewer, have all of your supplies organized and don't get distracted by stuff in your craft room or something going on out of the window.  Would I make another one of these?  Yes, definitely!  I'd say this project was a success!

Thank you for visiting today.  If you're not a follower of my blog, please consider becoming one.  Also, thanks for all of the nice comments!  Please visit often!

Thursday, April 30, 2015

April Pinterest-Inspired Project

I admit it.  I really like Pinterest.  During the past year or so, I've become more of a pinner than in the previous year after I started my account.  It's not an obsession, like I've seen portrayed in a video that's been going around.  I look at Pinterest this way:  it's like a virtual scrapbook for all of your good ideas and all of the cool things you see online. 

As you may know, I have a goal of trying out one of my pinned ideas each month.  I'm trying to vary the projects so that I'm not doing the same type of thing every month.  This month I chose the Mason Jar Pin Cushion Sewing Kit.  Just click over the words for the link to the instructions. 
This was a fun, easy project and I used a lot of things I already had in the craft room.  OK, I did buy the Mason jar.  And I found an adorable PINK measuring tape to go with it.  But that's it.  The pin cushion top only required a small piece of fabric, some fiberfill, felt and hot glue. 
Some little pins that I made with beads from my vast collection.

Little needlebook.

I also included some tiny spools of thread, scissors, a needle threader and some floss.  The needlebook and pin card were made with fabric covered cardboard and felt. 
Wouldn't this be a cute gift for someone just starting out on their own?  Or for someone just getting into sewing or quilting?  You also might want to keep this in mind for Christmas gifts for the crafters and seamstresses in your life!

So to sum it up, this was an inexpensive, relatively quick, and fun project to put together.  Let me know what you think!

Thursday, March 19, 2015

Meet & Greet

Welcome to my blog!  Today is the Meet & Greet which is organized by Madame Samm at the Sew We Stitch blog. I'm looking forward to this event because I like seeing what other stitchers, seamstresses and crafters are doing.

I've been doing cross stitch since about 1981.  Patterns, fabrics, floss and accessories have sure come a long way since then!  One of my favorite pieces that I stitched is a pattern called "Square Dance", which I made into a pillow.  I stitched this in the 1990's when I found this chart in a magazine. 
Another one of my favorites is "Peppermint Twist" by Blue Ribbon Designs.  I love the colors and all of the little motifs in this one.
I even framed it myself!

Sewing is something I've been interested in since I was 8 years old.  I used to make tiny dresses for my Barbie dolls out of tiny patterns.  And I sewed them by hand.  Then I graduated to making clothes for myself.  Nowadays, I like sewing things like tote bags and other small accessories.
I made these little bags for the ladies in my stitch group.
My latest project is an embroidery project called the Summer Garden Pin Cushion.  I had done some embroidery in the past, but really needed a refresher course.  This project was perfect for re-learning some things, and also for teaching myself some new stitches.
You can find the first part of the tutorial here.  Then just follow the rest of the tutorial posts for the complete instructions.

I hope that you enjoyed your visit to my blog today.  Please consider becoming a follower.  Other than the hobbies mentioned above, I also like to make beaded jewelry, crochet (A little.  I'm working on that.), and other miscellaneous crafty things.  And I enjoy blogging about all of them.

As part of this Meet & Greet, I am having a giveaway!  One winner will receive this little sewing companion that I stitched up just for this event!  Inside you'll find a pair of the cutest golden embroidery scissors.
All you have to do to have a chance at winning is comment on THIS POST by Friday, March 27th at 11:00 a.m.EST.  Also, please make sure that there is a way that I can contact you.  There is nothing sadder than not being able to reach a contest winner.  I will draw one name on that day and announce it right here on my blog.  I will also e-mail the winner.

Thank you for taking the time to check out my blog today.  Stop by again sometime!  You never know what you'll find here!